Users and Groups Page#
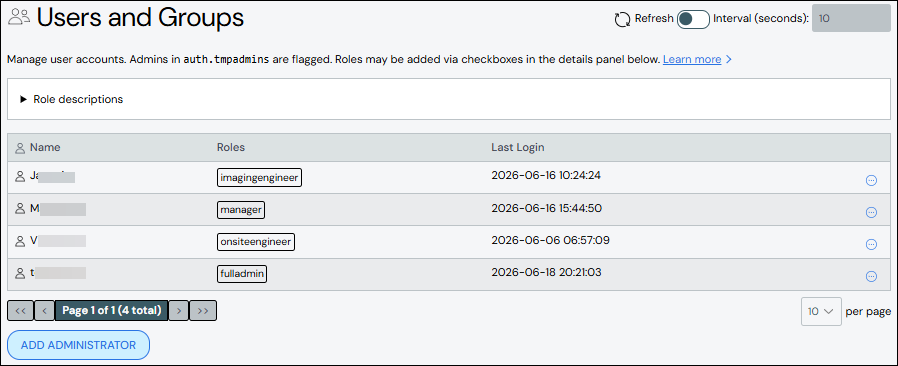
The Users and Groups page lists all administrator users, their permissions, and the date and time of their last login. Use this page to add and edit ClusterWareAI ™ administrators. The page is available via User Management > Users + Groups in the left navigation panel.
Note
All users listed in the Users table can be assigned administrator roles and permissions.
Administrators granted temporary access via "auth.tmpadmins" as defined in the
/opt/scyld/clusterware/conf/base.ini file are flagged in the list. See
Authentication for details about enabling temporary permissions.
Add Administrator#
Note
If you configured the ClusterWareAI platform with Keycloak, users must be added in both the Keycloak and ClusterWareAI softwares. See Integrating Keycloak with ClusterWareAI for details.
To create an administrator:
Click Add Administrator. The Add Administrator pane opens.
Add details about the administrator. Name and Roles are required fields. If you do not select any roles from the Roles field, the new user inherits your roles.
Default roles and descriptions are available at the top of the page by expanding the Role descriptions section or from Role-Based Access Controls. A list of permissions granted by the selected role is available by expanding the Permissions Matrix section or from User Roles.
The No Access role (all permissions revoked) takes precedence over all other selected roles. For example, a user with Full Admin and No Access selected is not able to access the ClusterWareAI software.
Click Add Administrator to save your changes. The new administrator is added to the list.
Edit Administrator#
Note
If you configured the ClusterWareAI platform with Keycloak, modifying roles must be done in both the Keycloak and ClusterWareAI softwares. See Integrating Keycloak with ClusterWareAI for details.
To edit an administrator:
Click the administrator name to open the administrator details, then click the Edit Administrator button. Alternatively, click the More menu
 on the far right of the row and select the Edit action.
The Edit Administrator pane populates with the administrator's details.
Make updates to the administrator.
Click Save to modify the administrator details.
Create Token#
All administrators can create a token for themselves using the Create Token
action either from the user drop-down in the top navigation bar or from the
More menu ![]() on the far right of their user row. Administrators with
the AdminWrite permission can create a token to impersonate another user using
the Create Token as User action on any user row.
on the far right of their user row. Administrators with
the AdminWrite permission can create a token to impersonate another user using
the Create Token as User action on any user row.
Click the More menu
on the far right of the row and select the
Create Token or Create Token as User action. Alternatively, click
your user name in the upper right corner and select the Create Token
action.The Create Token window opens.
Specify the token duration. You can either specify the duration in seconds or as a compact duration (dhm). For example, to create a token that will last one day, you can either specify it as
86400or as1d0h0mor as1d.Click Create Token to generate a new token for yourself or another user.
Copy the token to your clipboard by either selecting the text and copying or using the copy button.
Important
Make sure to save the token value as it is not saved in the ClusterWareAI software after you close the token window.
See Tokens and User Impersonation and Using Tokens with the ClusterWareAI API and Tools for additional information about creating tokens that impersonate other users.
Delete Administrator#
To delete an administrator, click the More menu ![]() on the far right of
the row and select the Delete action.
on the far right of
the row and select the Delete action.