Multi-Tenant Cluster Management#
Note
Tenants, tenancies, and other features are available if you have paid for multi-tenant support. Contact Penguin Computing to learn more.
The ClusterWareAI ™ platform supports multi-tenant clusters where a single super-cluster is sub-divided and whole machines are leased to internal or external customers. Within ClusterWareAI, the customers are known as tenants, and their leased sub-cluster is known as a tenancy.
After initial install and configuration, you can add tenants and tenancies to a ClusterWareAI cluster. The number of tenants depends on your super-cluster architecture. Each tenant has one or more tenancies.
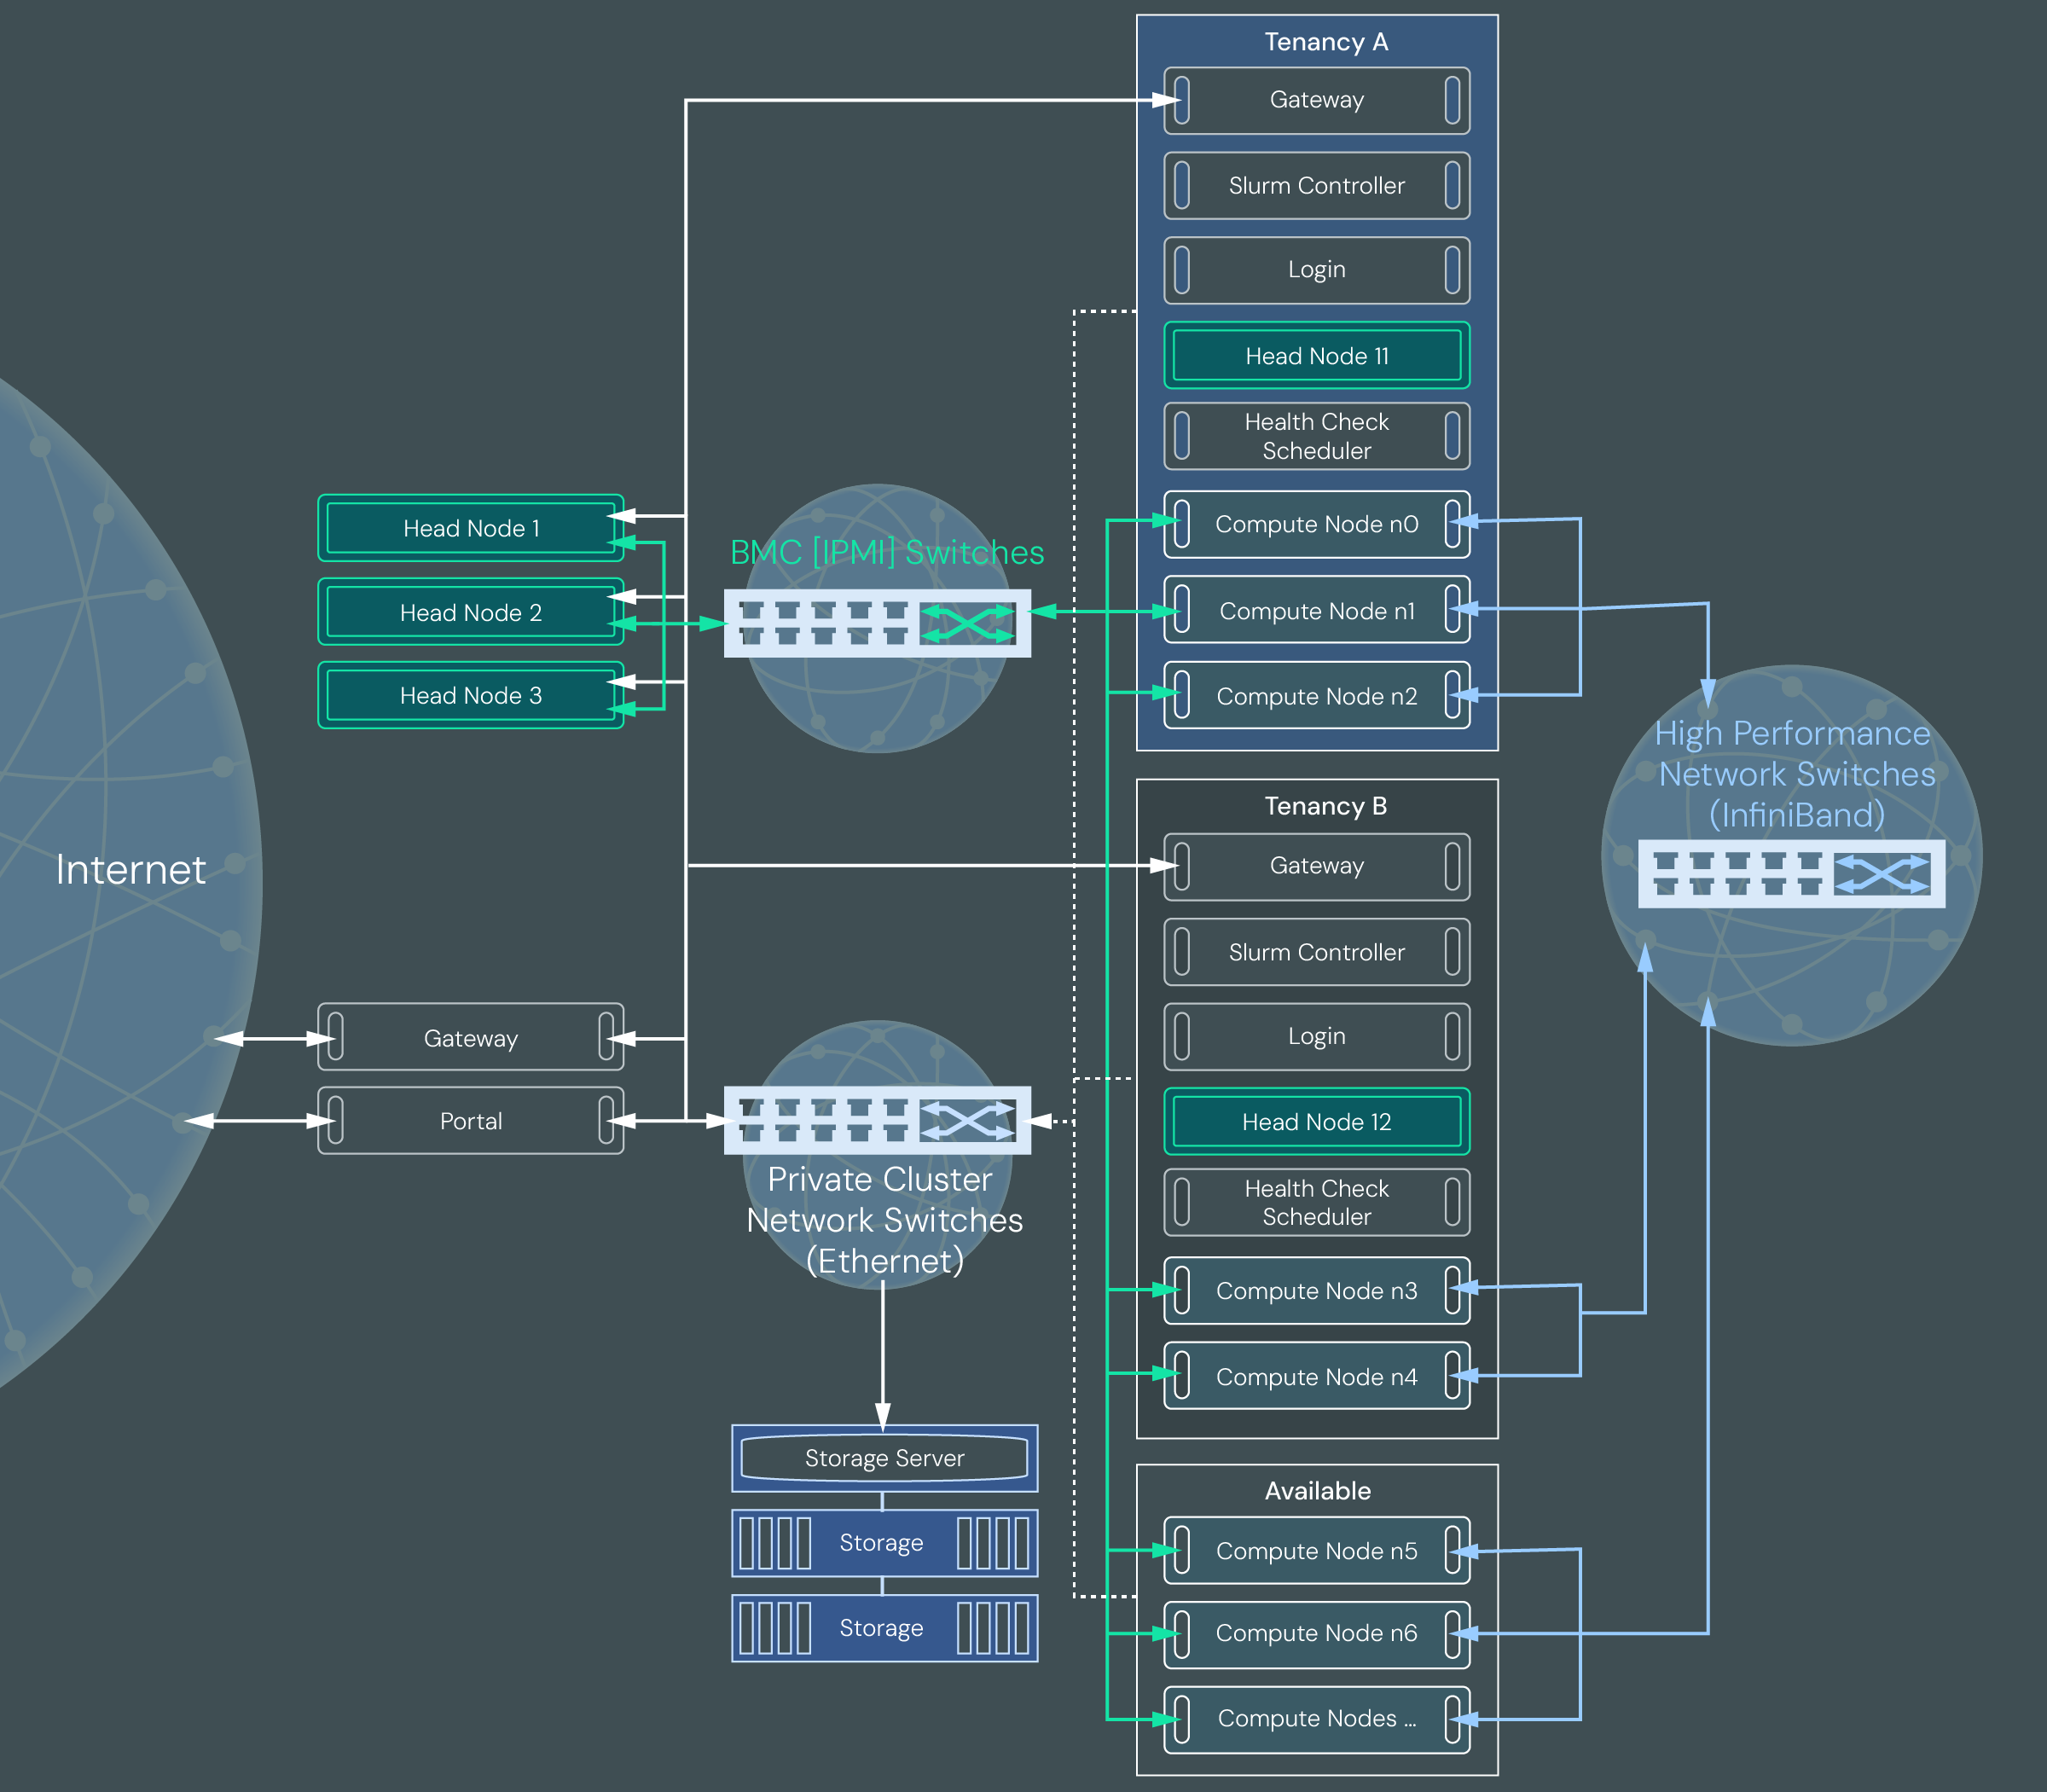
The following diagram illustrates a multi-tenant cluster configured with two customer tenancies.
Tenant#
A tenant is a customer who rents nodes on a larger ClusterWareAI instance, or super-cluster. Each customer is represented by a single Tenant object in the ClusterWareAI database. A tenant has a name, description, and one or more associated tenancies. Billing and other customer data is not managed by ClusterWareAI.
Each ClusterWareAI super-cluster can have multiple tenants each renting separate nodes in their own sub-cluster, or tenancy.
Tenancy#
A tenancy is a set of head nodes, compute nodes, and other hardware that is assigned to an individual tenant. Each tenant can have one or more tenancies, each of which are isolated from each other. For example, a large corporation may need a single tenancy to run an artificial intelligence cluster. Meanwhile, a university may need multiple tenancies – one each for the biology, engineering, and chemistry departments who are all running different HPC applications that may require different hardware, but do not need to share data across a common network.
The nodes within each tenancy are kept virtually separate from other tenancies via VLANs, VXLANs, virtual network identifiers (VNIs) and, optionally, partition keys (PKeys) for network isolation. This network isolation ensures that data is not shared across tenancies or tenants.
The ClusterWareAI administrator of the super-cluster (also known as the superadministrator) can see node status, health, and other details about the tenancy health. Access to tenancy data allows the superadministrator to take some actions, such as rebooting nodes after a power outage or resolving a node health issue. Each tenancy has its own ClusterWareAI instance and an administrator user assigned to the Managed Tenant role, which grants them access to many ClusterWareAI actions to manage their tenancy.
Currently you can create a tenancy that uses Slurm for job scheduling. A Slurm tenancy is typically used for more traditional HPC workloads where distinct jobs are submitted to a batch queue and are run in a first come, first served fashion.

A Slurm tenancy includes the following VM and bare metal nodes:
Gateway node: A gateway node provides secure access from the tenancy to the public internet.
Head node: Each tenancy has one head node. The head node provides the tenancy administrator user with access to a limited set of ClusterWareAI actions. In a typical configuration, a tenancy administrator can monitor node status, execute commands on nodes, and power cycle nodes. They are not able to access bare metal hardware or run administrative commands on nodes.
Slurm controller node: The Slurm node hosts the Slurm controller instance (slurmctld) and its related database (slurmdbd). The Slurm controller monitors the load on the compute nodes, receives new job requests, and assigns new jobs to the compute nodes. The tenancy administrator user can set up Slurm and execute Slurm commands.
Login node: The login node is how HPC application users can access and submit jobs to the cluster.
Compute nodes: Compute nodes are bare metal systems used to run applications within the cluster. Each tenancy has one or more compute nodes. Compute nodes within a tenancy should be configured to run health checks and use the auto remediation service (ARS).
Available and Quarantine Tenancies#
The Available tenancy and the Quarantine tenancy are created automatically
when you run the setup-for-mt script. After they are created, the
Available tenancy is empty and the Quarantine tenancy only contains a head node
and gateway node.
The Available tenancy is a tenancy assigned to the overall super-cluster that contains the available pool of nodes (that is, any nodes that are healthy and not currently assigned to any customer tenancy). For example, consider a super-cluster that contains 100 healthy compute nodes and has 5 tenants, each with 10 compute nodes. This means that there are 50 compute nodes that are not assigned to the 5 tenants and are in the Available tenancy. When a new tenancy is created, the ClusterWareAI platform assigns it nodes from the Available tenancy.
Unlike a customer tenancy, the Available tenancy only contains compute nodes. It does not have a head node or any other supporting virtual machines. The Available tenancy is empty after initial installation until healthy nodes are moved from the Quarantine tenancy by the superadministrator.
The Quarantine tenancy is used to run health and performance checks on compute nodes, wipe any customer data, and verify the node's firmware. Nodes within the Quarantine tenancy are virtually isolated from the high-performance network. When you first configure multi-tenancy, the Quarantine tenancy does not contain any compute nodes, so you should add all nodes you expect to allocate to customer tenancies to the Quarantine tenancy for initial health checks. When the compute nodes pass checks, move the healthy nodes to the Available tenancy where they can be assigned to customer tenancies. See Add Compute Nodes to Quarantine and Available Tenancies for details.
If a tenancy is decommissioned, the compute nodes that were members of that tenancy are powered off and sent to the Quarantine tenancy. They are powered on within the Quarantine tenancy and boot from a known good image. The nodes are wiped completely to ensure all data from the decommissioned tenancy, including programs, user and temporary files, customer application data, and so on, are removed. The node firmware is also reverted to a known good state. After the nodes are wiped and have their health and performance approved, they are moved to the Available tenancy and can be reassigned to another customer tenancy. See Monitor the Quarantine Tenancy for additional information and example commands.
The Quarantine tenancy is also used if there is an issue with a compute node that is currently assigned to a tenancy. If an issue is identified during a periodic health check, move the unhealthy compute node to the Quarantine tenancy for further testing and replace it with a heathy node from the Available tenancy. For example, Tenancy1 has 10 compute nodes (n0-9). Compute node n0 fails a health check and requires further evaluation. The superadministrator reassigns Node n0 to the Quarantine tenancy and assigns a node from the Available tenancy to Tenancy1 to replace n0. When n0 is repaired, the superadministrator moves it from the Quarantine tenancy to the Available tenancy.
All nodes assigned to a customer tenancy are moved to the Quarantine tenancy when they are removed from the customer tenancy. Nodes within Quarantine should only move to the Available tenancy - they should never move from Quarantine directly to a customer tenancy. Similarly, nodes from a customer tenancy never move directly to the Available tenancy. Nodes in the Available tenancy typically move to a customer tenancy, but can move back to the Quarantine tenancy if a health issue is found.
Important
The Available and Quarantine tenancies should not be deleted. They are required for multi-tenant clusters to properly allocate nodes to customer tenancies.
Tenancy Hardware Allocation#
Tenancies are automatically configured by the ClusterWareAI software with a combination of bare metal and virtual machines. The following diagram shows how the super-cluster and tenancy hardware is configured.

In a multi-tenant cluster, nodes within the KubeVirt virtual control planes are virtual machines and nodes outside the KubeVirt virtual control planes are bare metal machines. Typically compute nodes are bare metal and head nodes and supporting infrastructure nodes are virtual machines. At the super-cluster level, the bootstrap and disaster recovery node is also bare metal.
Tenancies are created using a Terraform file to request the appropriate number of compute nodes and supporting infrastructure nodes. When the Terraform file is submitted, the ClusterWareAI software starts an automated process to provision virtual and bare metal machines for the tenancy. If the Terraform file requests more compute nodes than are available, tenancy creation fails.
Tenant and Tenancy Life Cycle#
The following steps are typical during a tenant and tenancy life cycle.
Superadministrator: Create a Tenant.
Tenancy Admin: Submit tenancy requirements, such as number of compute nodes, using a Terraform file.
Superadministrator: Create a tenancy based on the tenant requirements. Behind the scenes, the ClusterWareAI software sets up the tenancy object, configures the head node, allocates compute nodes from the Available tenancy to the new tenancy, installs ClusterWareAI on the tenancy cluster, and makes the tenancy available to both the superadministrator and the tenancy admin.
Superadministrator/Tenancy Admin: Monitor and manage the tenancy, including monitoring node performance and health, rebooting nodes, and addressing problems or reallocating nodes if any fail health checks.
Superadministrator: Decommission tenancy and send nodes to the Quarantine tenancy when no longer needed by Tenant.
Superadministrator: Monitor the Quarantine tenancy for any nodes that require human intervention to fix an issue. Move healthy nodes to the Available tenancy.